To celebrate Mialinka turning the big ONE we had a party, a tantrum and a lovingly made Birthday cake, two in fact. Here is how it all happened and a recipe for both.
I burst into a torrent of uncontrollable, free-flowing tears and couldn’t even finish singing Happy Birthday when the morning finally came. It seems like yesterday that my little cherub was born and she’s just entered the fun stage of toddlerhood.
It’s challenging at times, I must admit (hello tantrums, she is strong-willed like her mama) but so rewarding at many more others. The laughs, the giggles, the morning cuddles and night time snuggles are soooo special. Watching her discover the world and her own abilities, each day bringing something new is such a blessing. Mialinka has become a little bubbly chatterbox and definitely knows what she wants – and what she doesn’t. I’m also really excited that she continues to be an adventurous and a very eager eater, it’s basically hard to stop her from wanting more food!
I love you to bits my little Mishka.
Now, Let’s Talk Cakes and Why I Made Two
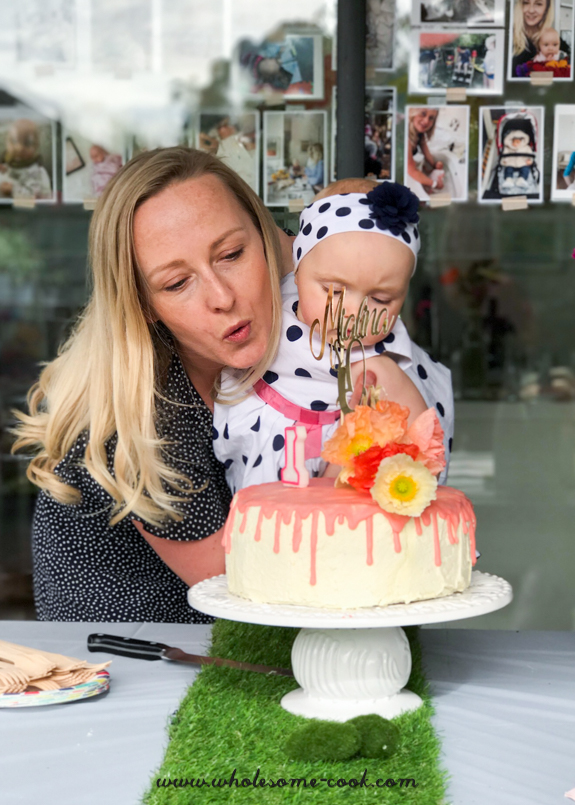
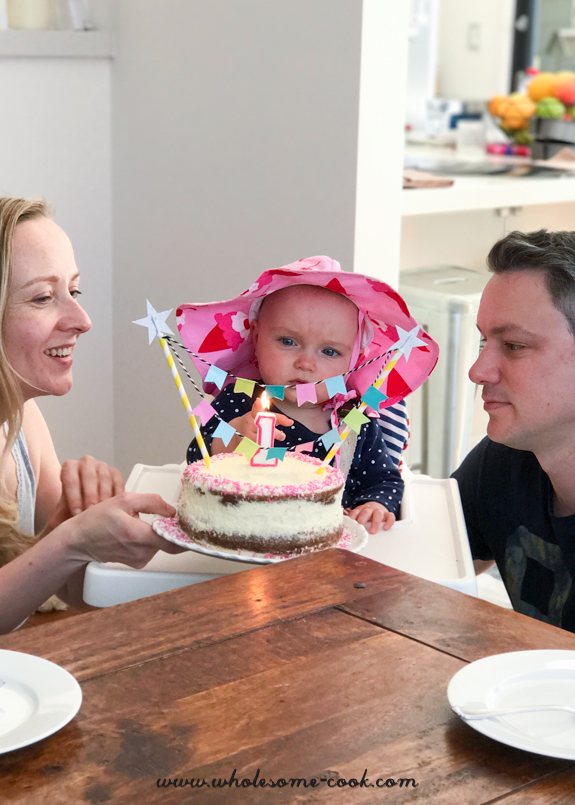
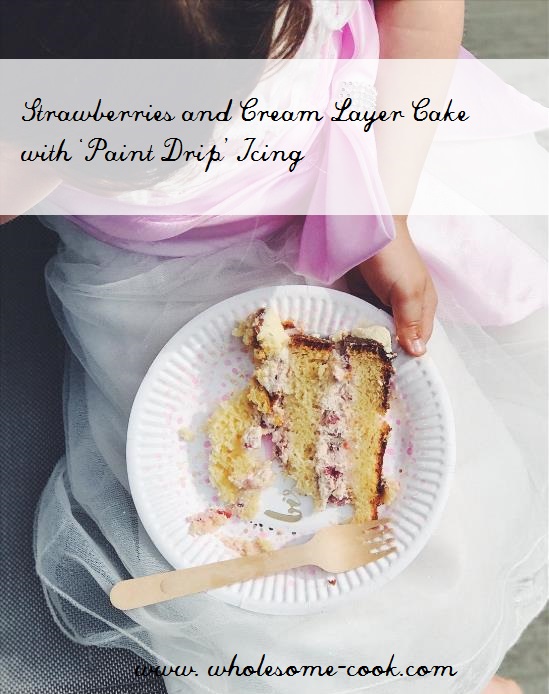
Since Matt could not be at Mia’s actual party, we also had a dry run of the cake making and a small family celebration the week beforehand. That’s why they look a little different. The innards were basically the same – the first cake only had one layer of strawberries and cream, the second two to make it a touch taller, and the icing differed.
I’m not a huge fan of fondant icing even though the decorations you can make with it are most adorable, and I don’t like traditional buttercream frosting (hello 4 cups of icing sugar), they are just not my thing. Instead, I went with a whipped chocolate ganache frosting and the ‘paint drip’ for the big party cake.
I am sharing the two options for the “frosting” in the recipe below – the simple whipped cream one is a little less complicated than the white chocolate ganache – a little less sweet and indulgent. Just as delicious, though.
The night before the party as I was making the cake, I overwhipped the ganache, it split slightly but I used it for the “wet crumb” stage that seals in all the crumbs and makes frosting-proper glide for a crumb-free finish. You can leave it at that stage, that’s what a “naked” cake actually is and that’s what I went with for the dry run cake with whipped cream.
As for the recipe, it might look like a lot of steps but the cake is super easy, both versions are. I think the recipe strikes a good balance between a fun and indulgent party cake with a handful of healthier additions and options.
Our First Birthday Party Supplies
With so much going on for me, I ended up only making some of the food for the party, ordering or buying the rest.
Soul Origin have a great afternooon special on their salads, wraps and sandwiches so I picked up a few of them to serve the next day, cheaper and no food wasted. We had some pretzels, salty sweet popcorn and salted crisps and two dips with vegetable sticks and crackers. There were also spring rolls – a party favourite – and little ham and cheese sandwiches for the kids, served with snacking tomatoes.
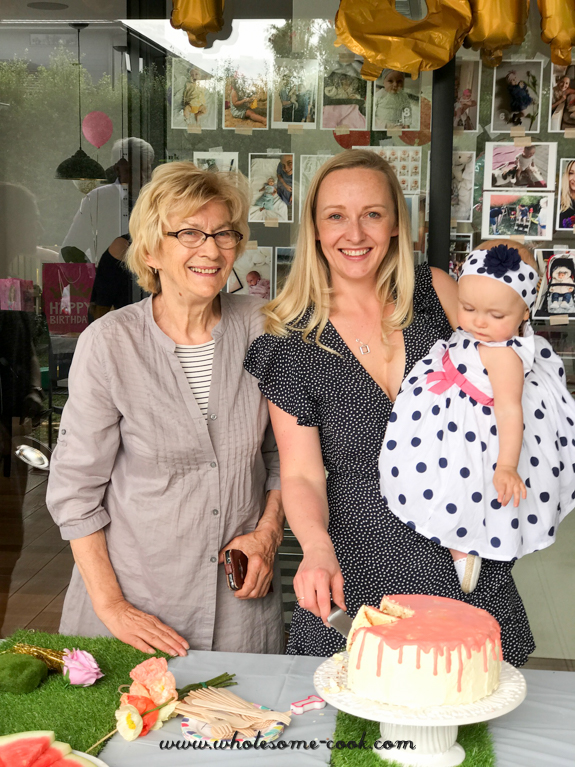
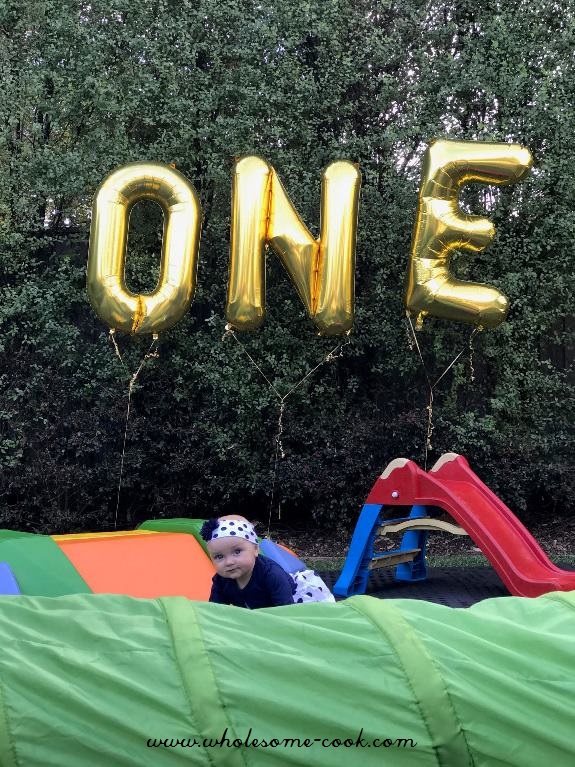
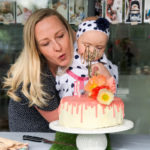
I also hired a set of soft play equipment for the little ones and a photobooth set to kids height for the older kids to have a bit of fun with. Mia was unimpressed by the get ups for a while – she started childcare recently and I think the party reminded her of that setting. She warmed up to it though and by the time everyone left she was having a ball it came to cutting the cake she was fine-ish.
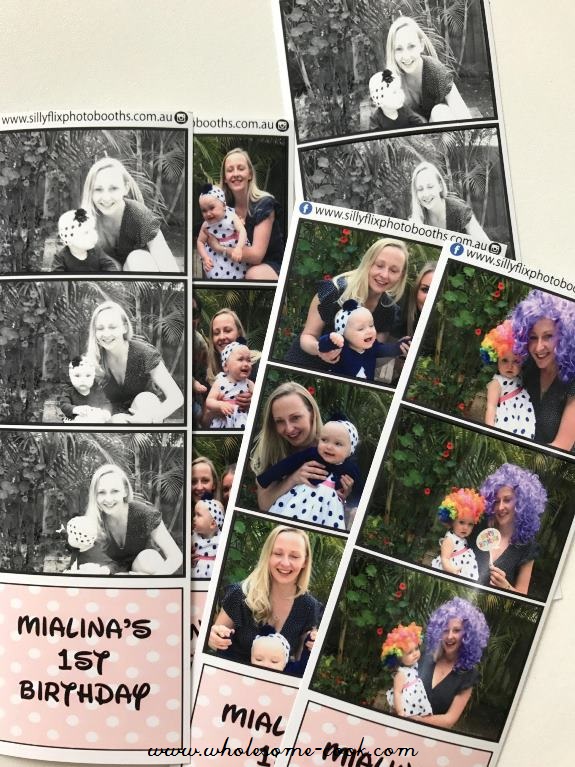
It’s my party and I’ll cry if I want to kept ringing in my head. I wasn’t too stressed about it – it’s actually quite sweet and special, they grow up so quickly I am being told. Besides, they go through these stages and it’s okay. The photo booth and play area were both a huge hit with our guests. As was the cake!
I picked up the laser cut persionalised cake topper from on eBay. The other one the trial-run cake was from Kmart.
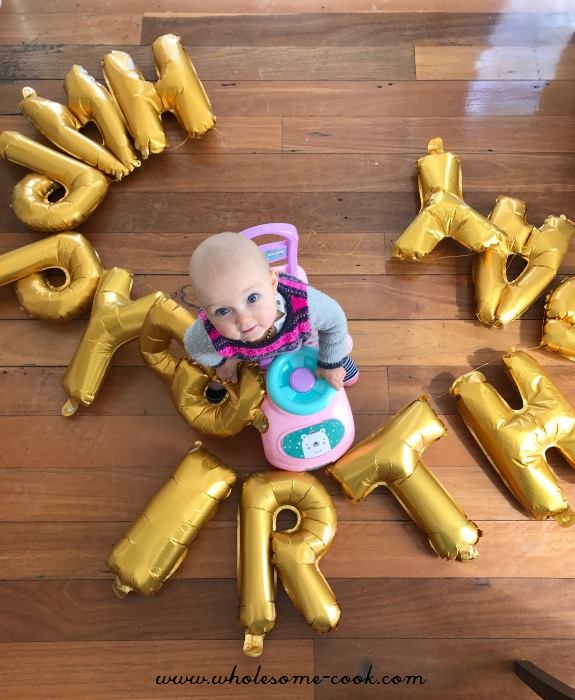
In terms of the garden theme decorations, most of it was made by Helena for her daughter Harper’s first birthday last year, who then sold it on gumtree to a friend from my mother’s group, who then sold it to me. The decorations have come a full circle, almost and such a great thing to see them re-used. The O N E balloons also made their rounds arriving to us from a friend’s baby’s photoshoot and were passed on along to another party that same weekend. Don’t you just love community! x
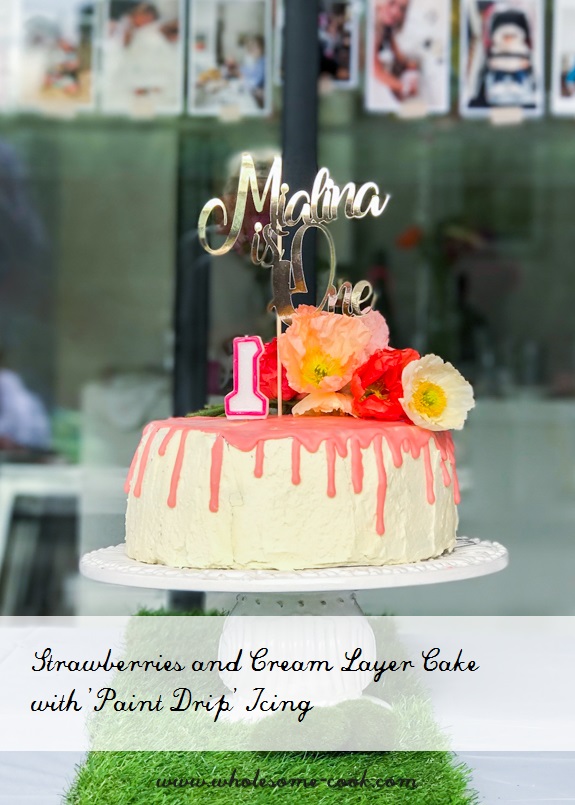
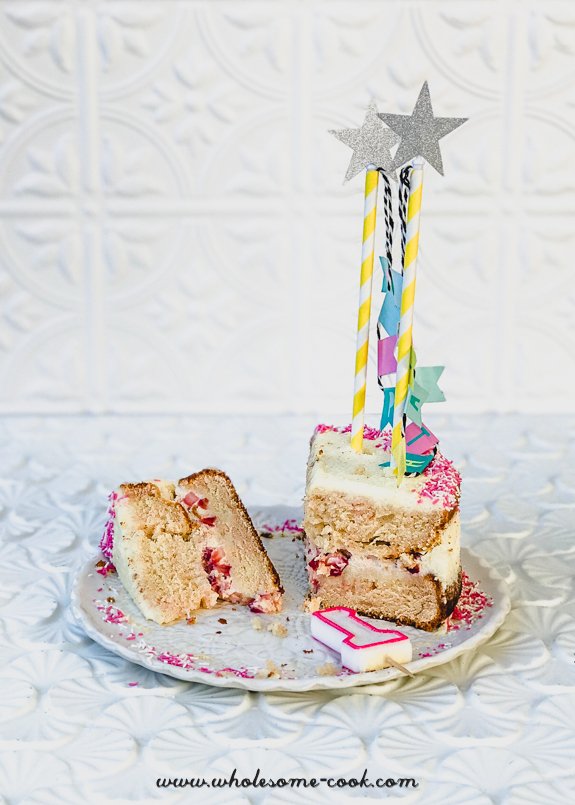
Strawberries and Cream Layer Cake with 'Paint Drip' Icing
Ingredients
For the Cake
- 200 g butter, plus extra for greasing
- 1/2 cup raw sugar
- 1/4 cup milk
- 4 eggs (I used 58g - large - eggs)
- 200 g self raising flour
For the Strawberries and Cream Filling
- 450 ml fresh (whipping) cream
- 1/2 teaspoon vanilla powder or vanilla extract
- 400 g strawberries, washed and diced
Option 1 - Whipped Cream Frosting
- 300 ml fresh (whipping) cream
- 1 teaspoon vanilla extract
- 2 tablespoons icing sugar
Option 2 - Whipped White Chocolate Ganache Frosting
- 100 g white chocolate melts (see note above, important)
- 300 ml fresh (whipping) cream
'Paint Drip'
- 100 g white chocolate melts (see note above, important)
- 5 tablespoons fresh (whipping) cream
- chocolate-friendly gel colour paste
Instructions
To make the Cake
- Preheat oven to 180C (160 fan forced / 375F). Grease the sides of a 20cm springform tin and dust with extra flour. Line the base with baking paper.
- Melt butter and sugar in a saucepan – do not boil, add milk and set aside to cool slightly. Beat eggs until light and fluffy. Sift flour into a large bowl and the melted butter and syrup mixture. Mix well. Add eggs and fold to combine.
- Pour batter into prepared tin. Bake in the centre of the oven for 30-35 minutes. Remove from oven and cool in the tin for 10 minutes before transferring to a wire rack. Allow to cool completely before cutting.
- Note: Allow to cool completely before cutting. To cut, slice the half of the domed top off the cake, so that you'll end up with a flat top. Slice the cake into 2 or 3 layers.
To make the Strawberries and Cream Filling
- Whip cream with vanilla until stiff peaks, fold in the strawberries. Refrigerate until needed.
Option 1 - To make the Whipped Cream Frosting
- Whip cream with vanilla and icing sugar until stiff peaks. Refrigerate until needed.
Option 2 - Whipped White Chocolate Ganache Frosting
- Melt half of the white chocolate in a bowl with half the cream (I used the microwave in 2 x 30 second bursts, stirring between bursts, but you can place the cream in a small saucepan and heat until steaming then pour over half the chocolate). Stir well. Add remaining chocolate and stir. Set aside to cool completely then chill in the fridge for an hour.
- Do this step just before icing the cake. Transfer the cooled chocolate to a bowl of a mixer and whip until pale and fluffy. Add remaining cream and continue to whip slowly, increasing speed until the icing is creamy - do not overbeat as the icing will split.
To assemble the cake
- Place the bottom layer of the cake onto the serving platter. Top with half of the strawberry cream mixture if using two layers of cake, or a third of the strawberry and cream mixture if using three layers of cake. Spread evenly to the edges. Top with the next cake (and strawberry cream) mixture - the last cake layer should be the trimmed off dome, placed upside down to achieve a flat top - the gaps will be filled with icing in the next step.
- Dollop a third of the whipped cream or whipped chocolate ganache on top of the cake and spread to the edges. Using a palette knife of a cake icing scraping tool, spread remaining icinng around the cake and into the gaps between the cake layers to achieve an even look outside. You can turn the cake to achieve a rendered look - I ended up scraping the icing up for a more textural effect. Place the cake in the fridge for 4-8 hours or overnight.
To make the 'Paint Drip'
- Note: Your iced cake will need to be chilled for 4-8 hours or overnight before performing this step so that the warm paint drip does not melt the icing.
- Melt white chocolate in a bowl with the cream (I used the microwave in 2 x 30 second bursts, stirring between bursts, but you can place the cream in a small saucepan and heat until steaming then pour over half the chocolate, mix well and add remaining chocolate). Stir well. Add a desired amount of gel colour, starting with a teeny bit - you can always add more but you can't take away, stir.
- Using a spoon, run the icing around the top outer most edge of the cake to create single drips, you can help the paint along by pushing streams off the edges. Drizzle remaining paint over the top - ensure it is quite warm and runny and spread evenly over the icing. Return to the fridge for 20 minutes to help it set.
12 comments
HAppy Birthday little Mialinka! She is adorable Martyna, you have done an amazing job with the party and the cake. Beautiful mama and daughter. Many blessings to you both.
Thank you so much Katie! We make a good team :-D
She is so cute, Martyna! And it sounds like a great party – the cake looks amazing and I bet it tasted fab. Happy Birthday Mia sweet girl.
Thank you Anita, the cake was indeed super tasty and I was most excited about a couple of the older kids saying how much they loved the strawberries and cream layer. Success!
You’re a wonderful mama to Mia, she is very lucky to have you x Wishing your little cherub a happy birthday!
Thanks KB :-)
Happy birthday, Mia! What adorable photos, and the cake looks delicious!
Thank you so much Awanthi! Hope you’ve been well!
Belated Happy Birthday Mialinka!!! The cake and pictures looks pretty fantastic too, Thank you!
Thank you Aria! x
Belated Happy Birthday, Mia. Such a beautiful cake.
This is perfect as I am organizing a party next weekend. Thank you for the inspiration.
She looks so gorgeous!! Great looking cake too; I’m sure she loved smooshing it all over her face!